My fourth graders had just finished up this seriously long color spectrum painting project, so we did not paint our papers, but perhaps in the future, this will be a nice twist. We discussed positive and negative space, which was also discussed in our color spectrum project, and learned about Notan Design from this slideshow. Okay, I always fess up that I am a picture stealer from the web. I'm not selling anything, I'm just resharing what is already out there...however this time, I'm resharing another slideshow that I worked into my slideshow to make it work for me. It was from SlideShare. I edited to my needs, and do give credit at the end. By the way, my fourth grader's heads' just about EXPLODED when they saw the face in the vase pictures. They were mesmerized. This was about 10 minutes of our whole discussion.
I passed out instructions, and every child was super confused. I knew this was going to be a tough one for some friends to grasp, so I made another video.
The kids were super impressed that I drew my leaf in one shot on the tracer without sketching, mistakes, and erasing. Pro-tip- I had it drawn in white colored pencil on the paper first.
Students made their tracers first. The project isn't about the tracers though, it is about the positive and negative space and complementary colors. I had about 6 students struggling to get any semblance of a leaf on their card and offered "pre-made" tracers to the entire class at the very end of the hour. That small handful took me up on the offer. My only intention here was to not have them already turned off from the project after the first step.
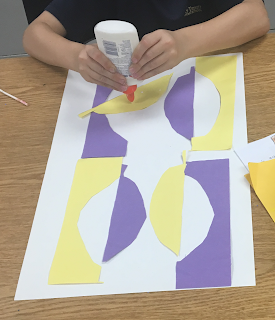
We folded and traced onto the colored paper. The trickiest part is the cutting, like I showed in the video, it's easy to forget what you are doing and just start cutting. But don't. Make sure students cut on the fold first! Then cut our their shapes. After that it is pretty easy peasy.
A few kids had a hard time figuring out the positive and negative parts, but overall it was smooth sailing.
The last day we went over our rubrics all together.
Here are a few completed pieces:

Check out our entire gallery on Artsonia.


No comments:
Post a Comment