I recently wrote about my cool resin and wood trays, that I made with second and third grade, making a bowl from magazine's and newspapers with third and fourth grade, making a perpetual calendar with sixth grade, and making a velvet pillow with kindergarten. Today, I'm going to tell you about this 2 x 6" Wood Plank Nativity.
One of the most popular items at this year's auction was the 2 x 6" Nativity made by my seventh graders.
I originally saw an item on Etsy and thought, "Hey! My kids could do that!" So, I set out to figure out how.
I first figured out how big I wanted each piece to be. I looked at the Home Depot website to see how long wood boards were, and how much they cost.
I wanted to make the nativity out of 4 x 6 wooden rails. They would be able to stand alone better than a size not as wide. Those proved to be way too expensive.
I settled with the 2" x 6" boards that came in 10' pieces.
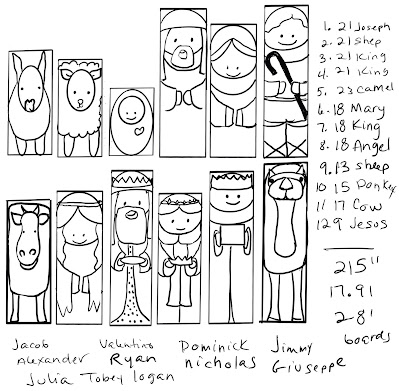
I put my drawing guide grid on ProCreate, and went ahead designing some pieces similar to the etsy listing to figure out the sizes.
This is my sketch and scribbles on ProCreate;
I fixed it and made it legible. I gave it to my husband to procure and cut the wood. Home Depot won't make all those cuts for you, but our friendly neighborhood Ace Hardware does.I lugged my pieces into school and prepped my seventh graders for the task at hand! I let them choose which nativity figure they wanted to paint. I only have 11 seventh graders, and they've known each other forever, so it is pretty easy having a conversation about who paints what. We had several people who wanted to paint animals or Jesus - because it seemed like the easiest! I drew names from a cup to make some final decisions.
I wrote up those directions and the kids got to work. I told them they did not have to copy my designs, or the designs from etsy - but it needed to fill the entire piece of wood.
We are displaced from the art room this year. One of the most difficult parts of this was the organization and distribution of paint. I prepped the colors in airtight plastic jars before class. Some of the more popular colors had more than one jar. After the kids drew with pencil and traced with permanent marker, they could come up and choose one color at a time to paint. They cleaned and dried their brushes at their seats. I purchased a new set of Arteza Acrylic Paint in tubes, and Sargent Art Acrylic Paint bottles. The Arteza was thicker and more opaque than the Sargent Art - but we did have to use several coats of paint with some colors - especially white.
If I were to make these again, I would probably do something to prep the wood a little better. The paint soaked in easily and sometimes the permanent markers bled.
I do not know where parents plan to display these, but I would also put an acrylic clear coat on top.
When all the painting was done and the paint was dry, we retraced our pictures with permanent marker.
Parents seemed to like it, I couldn't believe this thing went for $260! Wow, awesome.


No comments:
Post a Comment